
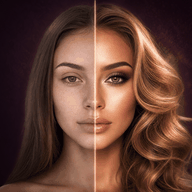
 Try this styleon your selfie · free
Face-Framing for Long Hair: Layers That Hug the Cheekbones
Published October 13, 2026
The right face-framing layers can sculpt your cheekbones, soften your features, and instantly modernize long hair, no big chop required.
Why Face-Framing Is the Easiest Hair Upgrade
If you love your length but feel like your long hair has gone flat or one-note, face-framing layers are the lowest-commitment way to transform it. These are shorter pieces cut around the front of your face that taper from a chosen starting point down into your lengths, drawing attention to your best features and adding movement where it matters most. Unlike a full layered cut, face-framing leaves the bulk of your hair untouched, so you keep your length and your security blanket while gaining a custom, sculpted frame. It's the technique behind nearly every glossy, expensive-looking long-hair moment you see online. Best of all, it works on every hair type and grows out softly, making it the perfect first step if you're nervous about layers but craving a refresh.
Where the Layers Should Start
The starting point of your face-framing layer determines the entire effect, so be intentional. For layers that hug and accentuate the cheekbones, ask your stylist to begin the shortest framing piece right at cheekbone level, around the height of your eyes or the top of your nose. From there, the pieces angle down and back into your length, creating a soft diagonal that traces your cheekbone and draws the eye to it. Starting higher, at the cheekbone, gives a more dramatic, sculpted, almost curtain-bang-adjacent effect; starting lower, at the jaw or chin, is subtler and softer. If you want versatility, a layered approach with the shortest piece at the cheekbone and connected longer pieces flowing down gives you sweeping, dimensional framing you can wear forward or pushed back.
Tailoring the Frame to Your Face Shape
Face-framing is a sculpting tool, so customize it to your features. Round faces benefit from longer framing that starts at or below the jaw, creating length and slimming the face vertically. Square faces are softened by framing that begins at the cheekbone and curves gently, breaking up the angular jaw. Long or oblong faces look best with framing that starts higher, around the cheekbone, paired with a fringe or shorter front layers to add width and shorten the face. Heart-shaped faces are balanced by framing that adds fullness around the jaw to offset a wider forehead. Oval faces can wear almost any starting point. Tell your stylist which features you want to highlight, the cheekbones, the eyes, or the jaw, and let them set the angle and length to flatter your specific proportions.
Styling to Show Off the Frame
Face-framing layers reward a little styling. The most flattering technique is to curl or bend the front pieces away from your face, which opens up your features and sweeps the layers back to graze your cheekbones, the same effect that makes a blowout look so polished. Use a one-inch to one-and-a-quarter-inch curling iron or a round brush, clamp the front section, and rotate it back and away from your face, then release and let it fall. A center or slightly off-center part lets both sides frame symmetrically. For a softer look, a few loose bends are enough; you don't need a full curl. Finish with a light shine spray or a touch of oil on the ends only. This simple away-from-the-face curve is the secret to that expensive, lit-from-within long-hair look.
Color and Face-Framing: A Powerful Pairing
Face-framing layers and brightening color are a classic duo for good reason, light placed around the face does the same flattering work as the cut. Ask your colorist for a hand-painted brightness concentrated on those front framing pieces, so when they sweep back they reflect light up toward your cheekbones and eyes. A soft, warm caramel balayage melted through the front is especially flattering because it adds dimension and a glow without harsh lines. The combination of softer, lighter front pieces and your natural depth behind creates a sculpted, three-dimensional frame that makes your features pop. Keep the contrast blended and soft for a modern, expensive finish. If you prefer to stay low-maintenance on color, even a subtle face-frame of slightly warmer tones up front enhances the cut's flattering effect.
Upkeep and Grow-Out
One of the joys of face-framing is how gracefully it grows out, the pieces simply lengthen and continue to frame your face, never leaving an awkward stage. That said, to keep the effect crisp, plan a quick trim of just the front pieces every six to eight weeks; many stylists will do this as a complimentary or low-cost touch-up between full cuts. Communicate clearly about length, since face-framing layers can creep shorter with each trim if you're not careful, so remind your stylist of your starting point each time. If you ever want to grow them out completely, simply skip the framing trims and let them blend back into your length over a few months. Low commitment, high reward, and reversible, it's the ideal long-hair refresh.
The quick checklist
- Start the shortest framing piece at cheekbone level to hug and highlight the cheekbones
- Go longer (jaw or chin) on round faces; higher on long or oblong faces
- Curl or bend the front pieces away from your face to open up your features
- Use a center or slightly off-center part for symmetrical framing
- Pair with hand-painted brightness on the front pieces to reflect light upward
- Trim just the front pieces every six to eight weeks to keep it crisp
- Skip the framing trims to grow it out seamlessly into your length
✦ Free to start✨ Try these looks on your own selfie with GlowMaxing →Upload one selfie and try any hairstyle, color or makeup look instantly with AI. Free to start.Download on theApp Store